Welded in the rear beam flex joint tubes. Im going to weld in an angled piece of tube next to them to fill up the rest of the space, mainly so it doesnt look goofy. Im sure they are plenty strong the way they are in the pics.


Started tinkering on a suspension positioning setup. This is my first prototype of the pot and arm assembly. It will connect to the suspension via a 8-32 endlink setup (similar to a swwaybar endlink).
The pot is a sealed honeywell 1/4 turn unit. Should provide some pretty decent feedback over a small range.
The pot will mount to a plate and a nylock nut will hold the whole assembly together.


Dan
Currently on jackstands.
Project updates and stuff:
www.clubhousecustoms.com
email: dan at clubhousecustoms dot com
I have no idea whats goin on in these pics, but they do look sweet

~2014 New Z under the knife, same heart different body~
______________________
WHITECAVY no more
2012 numbers - 4SPD
AUTOMATIC!!
328 HP
306 TQ
lol
Basically Im coming up with my own, inexpensive, way to monitor suspension travel at each wheel. I will be able to log this with the megasquirt so I can record and replay it. It should be a pretty good piece of information as to how much suspension travel and how much roll the car is experiencing.
Id like to also add two axis of G sensor someday. But we'll see if this works first.
Dan
Currently on jackstands.
Project updates and stuff:
www.clubhousecustoms.com
email: dan at clubhousecustoms dot com
Wow, I was wondering what the wires were for. Very cool..
~2014 New Z under the knife, same heart different body~
______________________
WHITECAVY no more
2012 numbers - 4SPD AUTOMATIC!!
328 HP
306 TQ
juicedz4 wrote:lol
Basically Im coming up with my own, inexpensive, way to monitor suspension travel at each wheel. I will be able to log this with the megasquirt so I can record and replay it. It should be a pretty good piece of information as to how much suspension travel and how much roll the car is experiencing.
Id like to also add two axis of G sensor someday. But we'll see if this works first.
Dan
your to damn smart for cavaliers... lol but don't ever stop making your own I love seeing what you do next

ʇı ɹǝʍo7 | ǝcoMonstǝrs
all aboard the bandwagon!

RaGiN Z (the fake 05) wrote:all aboard the bandwagon!
WTF are you talking about?

IDK. You can't subscribe without writing something, at least that I'm aware of.
While Im waiting for all sorts of metal to arrive for the rear suspension, I thought Id start removing some other metal.
My stock decklid arrived at VFN last week. I was told friday that they will be pulling the mold off of it and making my new lift off lid in the next 2-3 weeks. I figured that was reason enough to cut the trunk hinges and brackets out, and pull out the torsion springs. All said and done 8lbs removed. I still need to grind the welds smooth, touch up the paint and vacuum up all the chips. The new lid should be around 12-14lbs. Between the stock decklid and the hinges and crap I should be down about 30+lbs.


Then I pulled the front end all apart and started cutting. Plan is to have the front end come apart with two assemblies to here in <5 mins and shave off aobut 25lbs. The plan is for the bumper cover to come off first, then an assemly which will consist of the bumper support, headlights and upper core support second.
I dont have a great before shot, but I removed the upper core support, the panels behind the headlights etc (~10lbs). The stock bumper support (25lbs) will be replaced with some sort of aluminum frame (ya ya it wont be a "real" bumper).


I had to reroute some wires for the EGT sensor, EBC solenoid and the fan and alternator (which Im still working on). Also mounted the EBC solenoid to the radiator, instead of the core support.


More to come this week.
Dan
Currently on jackstands.
Project updates and stuff:
www.clubhousecustoms.com
email: dan at clubhousecustoms dot com
Insanity.... hahaha
That front air duct looks awesome.

Paying someone to install parts and bragging about it being fast, is like watching someone bang your wife and being proud to raise their kids.
Love it!!
~2014 New Z under the knife, same heart different body~
______________________
WHITECAVY no more
2012 numbers - 4SPD AUTOMATIC!!
328 HP
306 TQ
Can not wait to see it completely finished.
PRND321 Till I DIE
Old Motor: 160whp & 152ft/lbs, 1/4 Mile 15.4 @88.2
M45 + LD9 + 4T40-E, GO GO GO
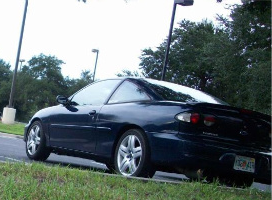
beautiful car...how the hell do you keep your undercarriage so clean??
This is my Signature sweet huh?
shiny03cav wrote:beautiful car...how the hell do you keep your undercarriage so clean??
its not daily driven and this guy has OCD X10 LOL
lookin good man. love the attention to detail for the weight loss.
 If it takes forever.... I will die trying. Underdog Racing
Yeah it helps that it only sees the road a couple times a year, haha. Not saying thats a bad thing.
Paying someone to install parts and bragging about it being fast, is like watching someone bang your wife and being proud to raise their kids.
So I got an email tonight. Apparently the swaybar mounts are ready for me to pick up

Dan
Currently on jackstands.
Project updates and stuff:
www.clubhousecustoms.com
email: dan at clubhousecustoms dot com
Well hello....
Do are you having burn parts for you?
Paying someone to install parts and bragging about it being fast, is like watching someone bang your wife and being proud to raise their kids.
Baffapotamus on roclife. Andy
Currently on jackstands.
Project updates and stuff:
www.clubhousecustoms.com
email: dan at clubhousecustoms dot com
Who not do.. lol
But nice, I didn't know he had a laser.
Paying someone to install parts and bragging about it being fast, is like watching someone bang your wife and being proud to raise their kids.
So, When are we going to change the pictures of J's on the site banner to this one?
NICE work. Extremely jealous/impressed.
Welded in the swaybar brackets to the axle beam. This is where the endlinks will attach to, multiple holes will correspond to various holes in the swaybar arms (for different rates).


Also, not shown yet, I made some sleeves for the lower shock mounts, so I can use 3/8" bolts instead of 12mm bolts. This will allow me to use the shock mount hole as one of the swaybar endlink positions.
Dan
Currently on jackstands.
Project updates and stuff:
www.clubhousecustoms.com
email: dan at clubhousecustoms dot com
Finally made it over to pick up the swaybar mounts last night.


May try to test fit them tonight, with any luck have them at least tacked in sunday.
Dan
Currently on jackstands.
Project updates and stuff:
www.clubhousecustoms.com
email: dan at clubhousecustoms dot com